

Let’s Continue Classroom Collaboration!
by OTAN SME Cindy Wislofsky
Collaboration. Collaboration Tools. Collaboration Activities. All good terms for working in groups to move learning forward and enhance the learning experience. The California Adult Education Digital Learning Guidance document reminds us that collaborative opportunities are essential for learners in higher education. They foster a more engaging and interactive learning environment, prepare students for future careers, support distance learning, and help develop a wide range of skills that are vital for success in both academic and professional settings. For more details about collaborative tools, make sure to read the Digital Tools for Collaboration section starting on p. 70.
How are you using tools or apps for collaboration with your adult learners? Would you welcome a few more ideas for your technology bag of tricks to keep your students engaged in interactive ways? Let’s review three collaborative digital resources that could be used to enhance your lessons, talk about any new collaborative features or tips for use, share some suggested classroom activities to engage your learners in teamwork, and list a few resources for further learning.
A. Google Docs- link for more info and to sign up; Google Docs are housed in your Google Drive.
![]() First, there is Google Docs, of course. You’ve probably used this popular document creator/editor for your own purposes, but one of its superpowers is how easy it is to share with others, just like other Google Apps (e.g. Sheets, Slides). Remember to select the Share button in the top right above the document to see your sharing options. Once a doc is shared, collaboration begins. Imagine partners or groups writing about a historical figure together, completing a table to share ideas for an upcoming team presentation, or adding multiple images to form a category collage of a current topic or theme.
First, there is Google Docs, of course. You’ve probably used this popular document creator/editor for your own purposes, but one of its superpowers is how easy it is to share with others, just like other Google Apps (e.g. Sheets, Slides). Remember to select the Share button in the top right above the document to see your sharing options. Once a doc is shared, collaboration begins. Imagine partners or groups writing about a historical figure together, completing a table to share ideas for an upcoming team presentation, or adding multiple images to form a category collage of a current topic or theme.
Besides basic word processing tasks like changing the font style/size, page layout, headers/footers, or adding bullet points, did you know you can easily make comments, add emotions, and suggest edits to team members’ work? Perhaps you want to ask a question about a certain word or section. Maybe you want to show your support for an idea you agree with or want to suggest an alternate wording. Learners can support each other, learn from each other, and problem-solve in a collaborative way.
How to Add Comments, Emotions, or Edit Suggestions
- Highlight the text in the document you wish to respond to.
- See the small three-icon menu that pops up to the right.
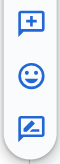
- Click the top icon to add a comment, the middle one to add an emoji, and the bottom one to suggest an edit.
- A window opens in the right margin where you can add your choices.
Note: There are tons of emojis - just like on your phone! See the category groups at the top of the window or use the search line to find what you need. 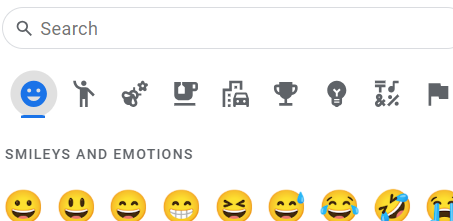
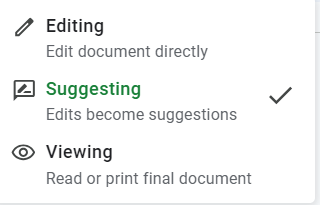
Tip: After using the suggested editing feature, to turn it off, select the pencil in the top toolbar and in the dropdown menu, change Suggesting to Editing. Otherwise, you will be suggesting and suggesting and suggesting!
Checklist Feature
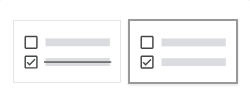
In addition to the commenting features, there is also a new checklist feature. Maybe teams will be collaborating on a project requiring different tasks. Why not have them use this feature to list the tasks right into their group document to be checked off by any member as each task is accomplished. It can be a cooperative organizational tool. Find the checklist icon in the main editing toolbar above the document. It looks like a list icon but with check marks, rather than the familiar bulleted list or numbered list icons.

There are only two choices for the checklist style when you use the down arrow, text crossed out along with the box checked off (default) or only the box checked off.
Classroom Activity Ideas using Google Docs
- Reporting Interview Results - after students interview a partner, they input what they learned onto a table in a document shared with the entire class. Use discussion, comprehension checks, or a scavenger hunt to work with the content.
- Team Story-Building - groups each have their own document. One student begins their group’s story with a short paragraph. The next student adds to the story with their own ideas. The story builds until all group members have had a chance to add to the story. The group decides on a title and adds images to reflect the storyline. Groups share their story with another group or the entire class.
Video Tutorials
- Strategies for Student Collaboration in Google Docs (Edmonton Public Schools - Technology Help) 6-minute video, Dec. 2022
- 5 Amazing Google Docs Hacks! (Jamie Keet, Teacher’s Tech) 8 ½ minute video, Feb. 2023
- 10 Best Google Docs Hacks for Teachers (Pocketful of Primary) 9 ½ minute video, March 2023
- Google Docs - Google Series Part 1 (OTAN video presentation by Melinda Holt, Project Specialist II) 1 hour + 25-minute video, June 2020
- Google Docs - Google Series Part 2 (OTAN video presentation by Melinda Holt, Project Specialist II) 1 hour + 20-minute video, June 2020
B.Padlet– link for more info and to sign up
![]() Next, there’s Padlet, a digital bulletin board for posting text, images, video, audio, links and more. If you haven’t used this collaborative tool yet, it is definitely worth trying out. A free account (Neon level) allows three active Padlets at a time, but you can archive a Padlet to free up space to create another Padlet. Then, unarchive it to use again. For unlimited Padlets, consider a schoolwide paid account for 10 or more teachers (Padlet Backpack).
Next, there’s Padlet, a digital bulletin board for posting text, images, video, audio, links and more. If you haven’t used this collaborative tool yet, it is definitely worth trying out. A free account (Neon level) allows three active Padlets at a time, but you can archive a Padlet to free up space to create another Padlet. Then, unarchive it to use again. For unlimited Padlets, consider a schoolwide paid account for 10 or more teachers (Padlet Backpack).
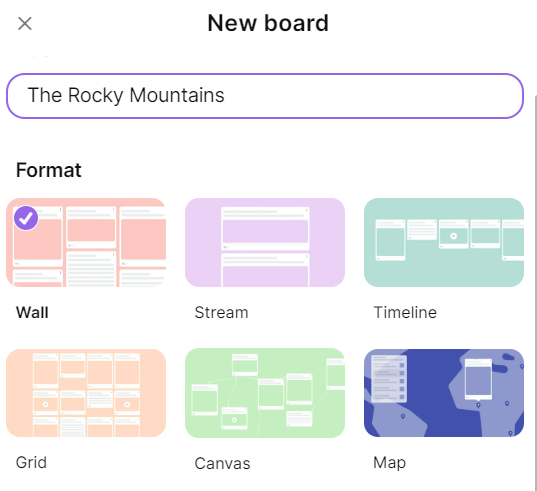
Make a new Padlet by naming it and selecting a Format choice.
Use the Settings wheel to continue through more options to add a description, icon, wallpaper, fonts, get a URL, decide if you want to approve posts, etc.

Use the Share Settings arrow to copy the Padlet link for your learners, add collaborators, set the privacy level, get a QR code, and more.

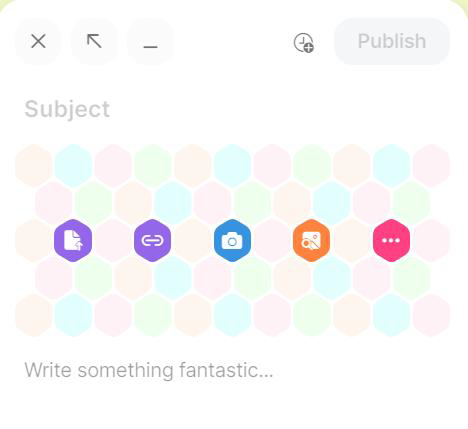
Once shared with students, they start a post by clicking on the plus in the bottom right corner (or double-clicking in the Padlet itself). Here they can title and/or put their name on the Subject line, click on the quick-access icons to add a file, link, image, take a photo, and type a response below.
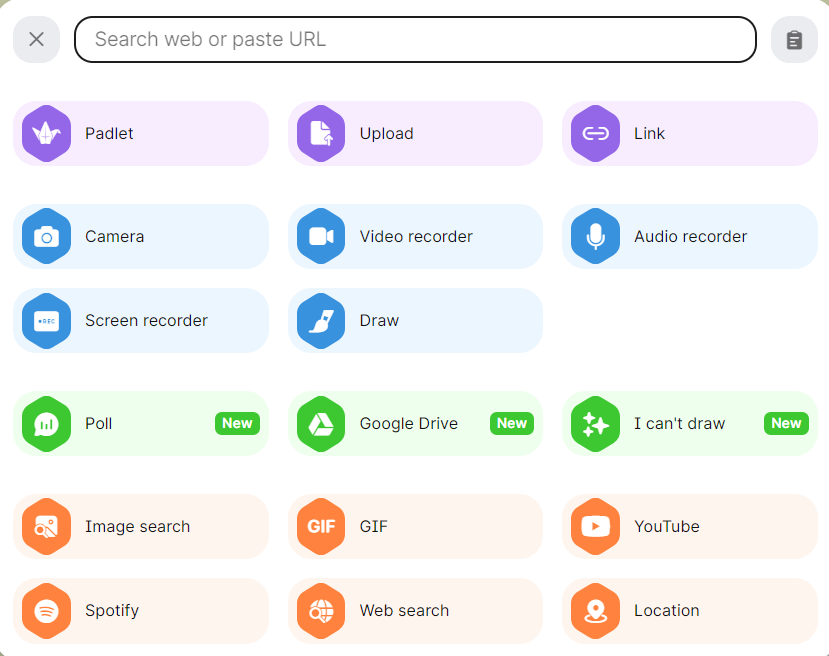
But the More three-dots red icon on the right opens up to a magical list of posting/uploading options, including a video recorder, audio recorder, and screen recorder, access to YouTube videos, GIFs, Google Drive, etc. So many options for sharing information and course-related material!
New Padlet Features
1. Slide Show option
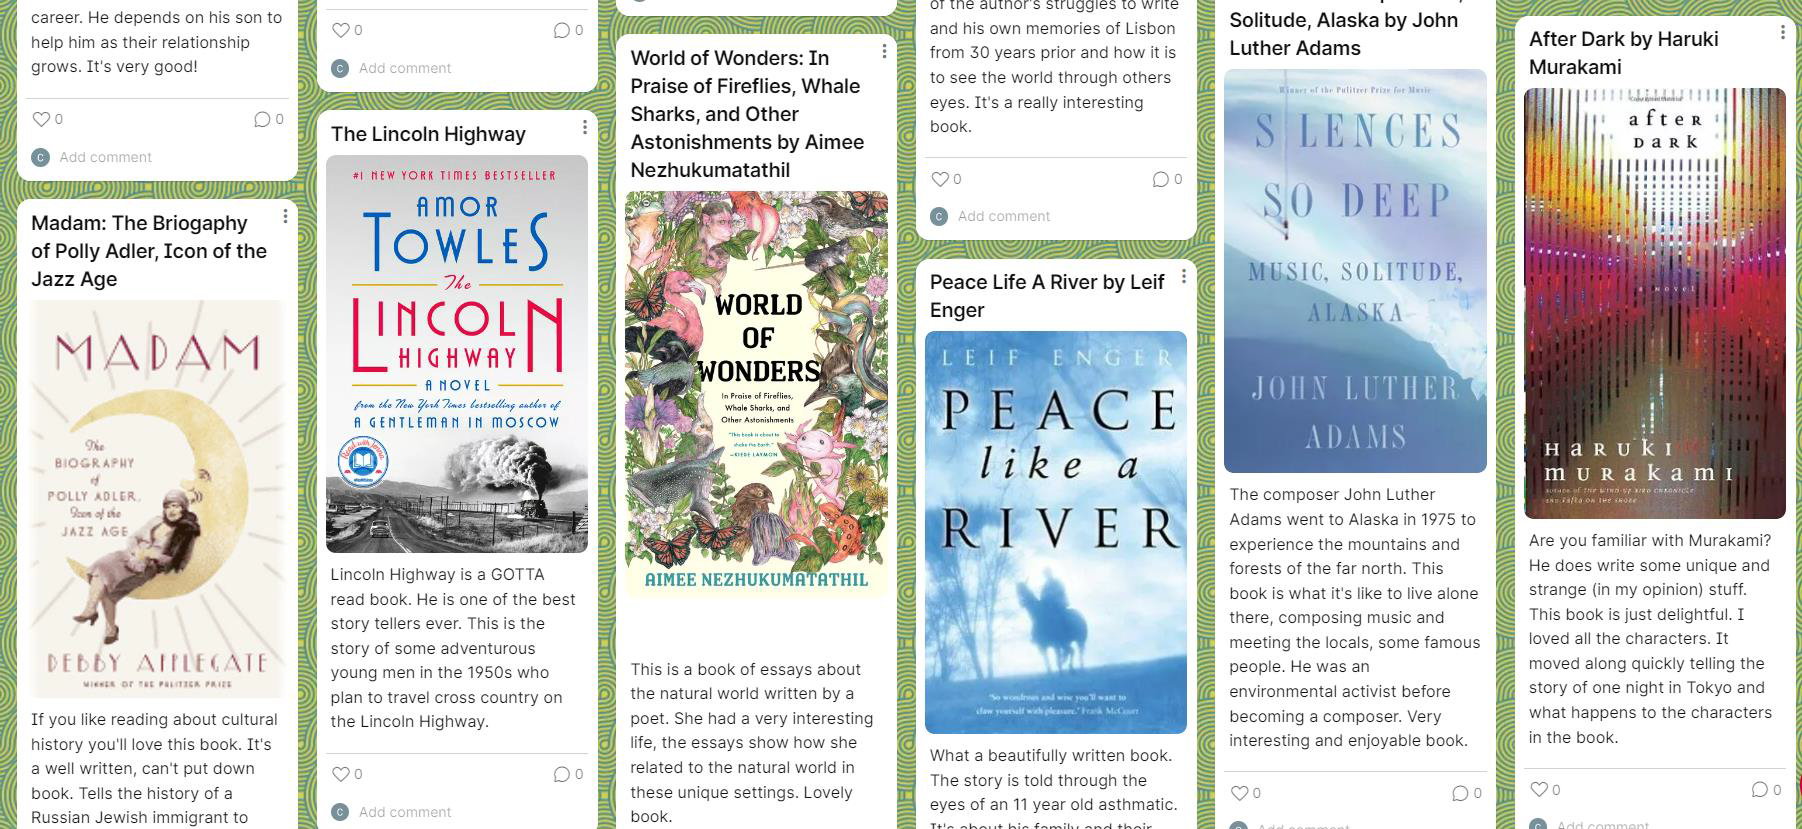
Here’s what a Padlet might look like after everyone has posted something. This example is for book recommendations.
Now, look for the play icon in the right vertical toolbar and select it.

Instantly, a slide show begins! Each post is a separate slide just like the slide below. Note the numbering underneath showing what slide you are on. Can you picture your students presenting their group’s Padlet on a particular topic to engage the entire class?

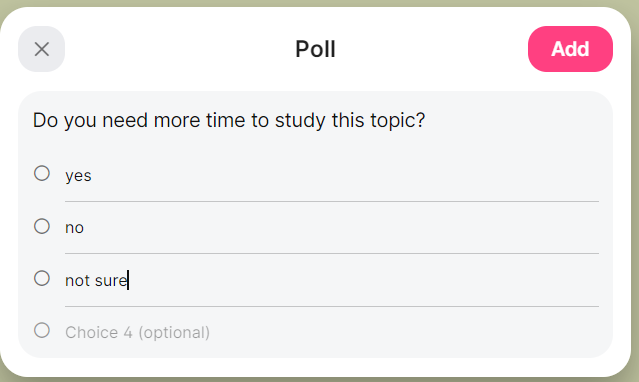
2. Create a Multiple-Choice Poll Question
Another new feature is to add a one-question multiple choice poll for your audience to vote or share their opinion! What a great way to get everyone involved, get instant feedback, and keep the conversation going on the topic at hand.
Here’s how to start a poll.
- Start a new post.
- Select the More three-dots option.

- Choose Poll.

- Complete the form and Add it.
Classroom Activity Ideas using Padlet
- Get to Know One Another - at the start of the school year or semester, students introduce themselves, post a photo of a place they like to visit, and video record, audio record, or write something to explain about this place. Others comment or ask a question to learn more by typing in the Add Comment line at the bottom of someone else’s post.
- Ask Questions during Day’s Lesson - share a Padlet at the beginning of class for students to post questions anonymously about the lesson. Use the last few minutes of class to address the questions. This can help to clarify confusing content, offer the teacher some valuable feedback, and level out the playing field for those students who may lack confidence to speak up.
Video Tutorials and Article
- How to use Padlet – Beginners Tutorial (Jamie Keet, Teacher’s Tech) 16 ½ minute video, Sept. 2022
- 8 New Padlet Features Every Teacher Should Know (Pocketful of Primary) 16 ½ minute video, Sept. 2023
- 2023 Summer release – summary of new features (article by Padlet Gazette), Aug. 2023
- One of the 5 Tech Tools to Try with Adult Learners (OTAN article by Yescenia Delgado Lorenzo, Subject Matter Expert), Jan. 2023
- Discover – or Rediscover - Padlet (OTAN video presentation by Kristi Reyes, Subject Matter Expert), April 2020
C. Figjam - link for more info and to sign up
![]() Another useful collaborative tool is a digital whiteboard such as Figjam. Figjam includes common elements like a marker, highlighter, eraser, sticky notes, textboxes, and shapes. However, Figjam also offers easily insertable tables, arrows, shapes (with textboxes automatically inside them), stamps (e.g. thumbs up/down, question mark), widgets (e.g. dice to roll, voice memo), stickers (e.g. editable clipboard agenda), and more.
Another useful collaborative tool is a digital whiteboard such as Figjam. Figjam includes common elements like a marker, highlighter, eraser, sticky notes, textboxes, and shapes. However, Figjam also offers easily insertable tables, arrows, shapes (with textboxes automatically inside them), stamps (e.g. thumbs up/down, question mark), widgets (e.g. dice to roll, voice memo), stickers (e.g. editable clipboard agenda), and more.
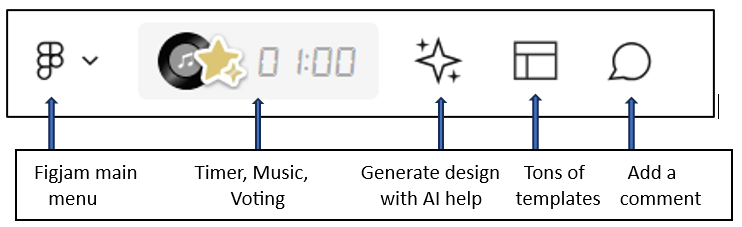
Once you sign up for a free account as an educator and you start your first Figjam, you will see this bottom toolbar.
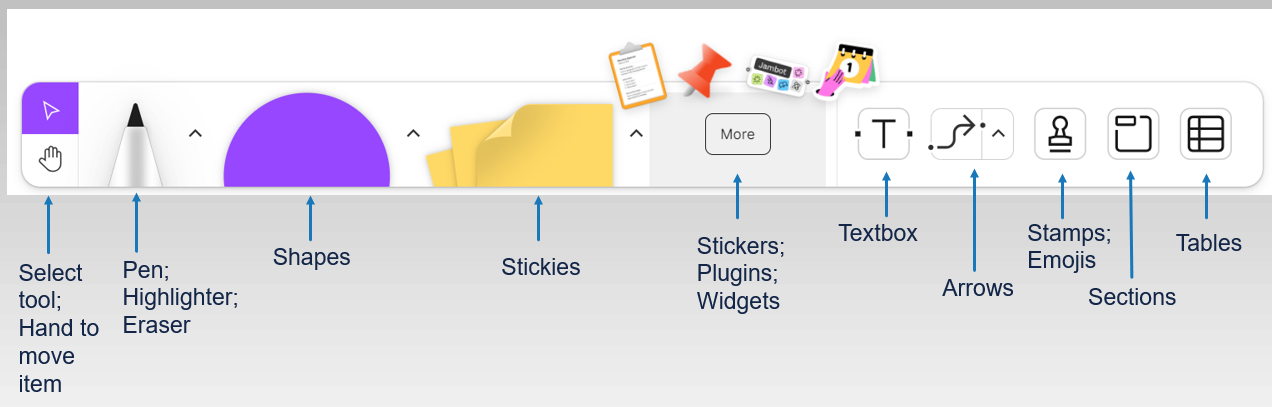
And these items in the top left above the Figjam.
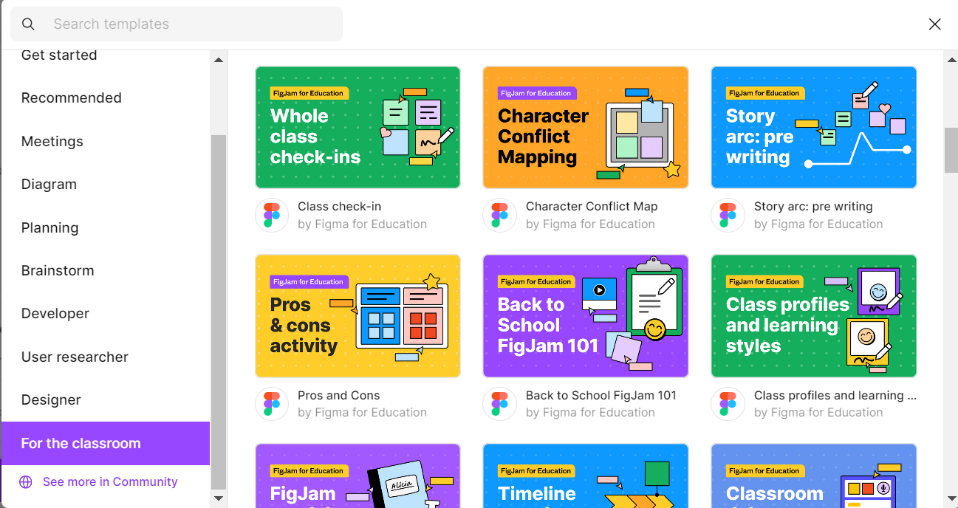
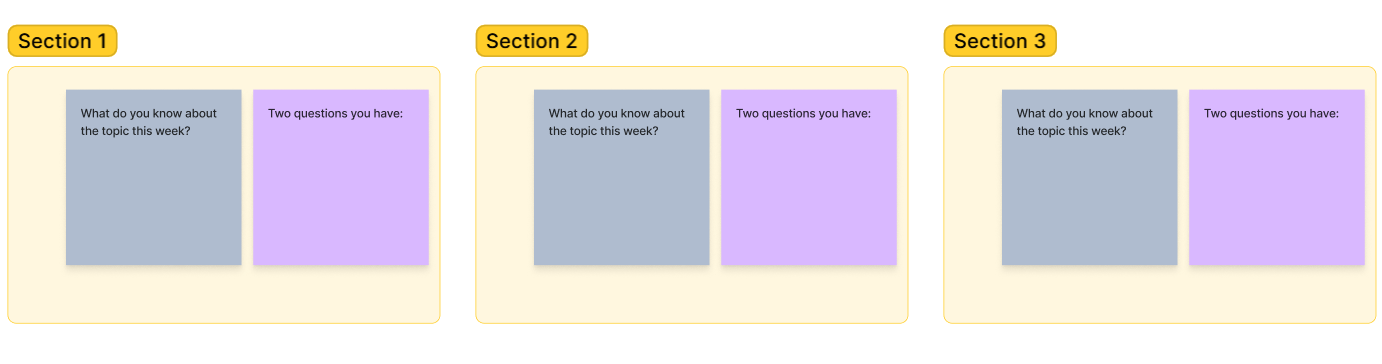
The multitude of templates are one of the best features of Figjam. Find ones to brainstorm, plan, guide a meeting, list pros and cons, and more. Check out the For the Classroom section for templates that might be useful in your particular course, including the popular Whole Class Check-ins.
Tips for use
- Figjams can seem like one infinite whiteboard. There are no individual slides or frames (as was the case with Google Jamboard). Make different Figjams for different purposes or use one for multiple activities. However, you can make sections and duplicate them for different groups to interact with on the same Figjam. Create a section (from bottom toolbar), add items, duplicate it (Ctrl/Cmd + D), and new sections are automatically numbered. Rename the Sections as desired.
- To get started, create a ‘team’ (e.g. course) and a ‘project’ for the team (e.g. assignment).
- Templates or widgets, etc. may appear small on the whiteboard. Use the zoom controls in the top right corner, do the 2-finger zoom on your laptop touchpad, try Ctrl + mouse scroll wheel or Cmd and +/- on a Mac.
- It takes a while to get used to the hand tool to move around the board vs. the arrow tool to select an item. Besides choosing each from the bottom toolbar, try the shortcut by pressing H on your keyboard for the hand tool and V for the select tool.
- Along those lines, move your mouse slowly over each of the bottom toolbar items to see their keyboard shortcuts (e.g. textbox = T, sticky note = S).
- Students can join at no cost as well as the teacher. Currently, when sharing Figjams with students who don’t have accounts, there is a 24-hour time limit when editing can occur. This may or may not meet your needs, but it is Figma’s policy.
Classroom Activity Ideas using Figjam
- Brainstorm – when introducing a new topic, have all students type their basic prior knowledge or questions about the topic on a sticky note. Then, categorize and group the notes in teams in order to develop organizational skills. Use their input to drive your lesson-planning.
- Exit Ticket – after a lesson ends, learners answer the question, “How can you apply what you learned today in your own life?” onto a textbox or sticky note. Use that information for group discussion another day and to determine if transfer of information/skills has occurred into students’ lives outside of class.
Video Tutorials and Articles
- Transition from Jamboard to Figjam: A Teacher’s Guide to Your New Favorite Classroom Whiteboard (David Curran from Figma for Educ) 9 ½ minute video
- Study Hall: Figjam Whiteboard Basics for Education (Miggi from Figma) 19-minute video
- How to Use Figjam – Best Whiteboard Option! (Jamie Keet, Teacher’s Tech) 17 ½ minute video
- Guide to Figjam overview article (Figma Learn)
- Explore Figjam Files article (Figma Learn)
Summary
In conclusion, are you ready to engage your learners with one or more of these tools to continue collaboration efforts? Although there are many other possibilities, consider Google Docs, Padlet, and Figjam for their unique features suited for teamwork and the ease of use to interact with them.