

NoRedInk: Use It to Improve Writing Skills
by Susan Coulter
by Susan Coulter, Baldwin Park Adult & Community Education, Baldwin Park, CA
Posted September 2015

NoRedInk is a fun tool to help students improve their writing skills. Students learn grammar, mechanics, usage, and style by using a curriculum based on their favorite celebrities, friends, TV shows, and more. They receive immediate feedback and unlimited practice. Diagnostics, practice, and quizzes can be set up in minutes and grading is automatic. Teachers can set up different classes and have students enroll in their class using a classroom code for each class. Teachers can then follow student progress and scaffold learning by assigning additional practice to struggling students.
NoRedInk has both a Basic (free) and a Premium version. Basic is quite comprehensive and sufficient for most classrooms. However, Premium users have access to more than 250 additional topics; specific curriculum aligned to Common Core Standards, SAT, and ACT; monthly data-driven reports; and administrative account access. To view the Basic and Premium topics, select View Site as a Student and then select Practice on the top left of the screen. Then choose a topic to see the Basic and Premium topics. The cost for Premium is based on the number of licenses needed, and agencies must apply directly to NoRedInk to receive a price quote.
Note: NoRedInk does not work well with Firefox due to a recent Firefox change. Chrome and Safari work well.
NoRedInk Components
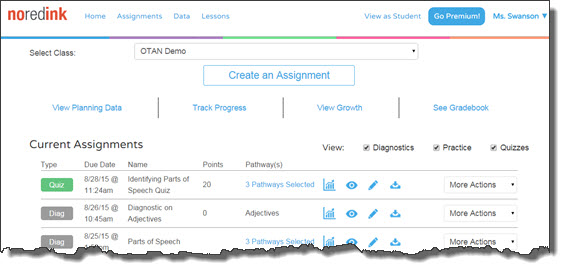
There are three main components of NoRedInk Assignments: Diagnostic, Practice, and Quiz. These three components are used for diagnostic purposes, practicing a concept, or quizzing students to see whether they learned the material in order to progress. They can be found by selecting the Assignments link at the top of the page and choosing Create an Assignment.
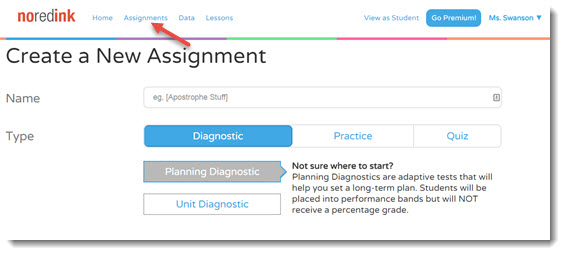
Diagnostics are used to identify a student’s strengths and weaknesses, and to help the teacher either set a long term plan for instruction or set a reference point before starting a new unit. Diagnostics are adaptive tests in which a wrong answer will generate a subsequent question of reduced difficulty. If you choose to use the Planning Diagnostic, you will only see the major topic categories, but if you choose a Unit Diagnostic, you will see each of the topics broken down into subcategories and you can also see which are free and which are Premium (those with the lock).
Practice allows students to master their skills in smaller discrete units. Practice can be assigned or the student can practice the topic of their choice at any time. By selecting a topic, students are able to practice until mastery is achieved. Mastery scores are out of 100, but are not percentages. They track the types of mistakes the student is making so that students only receive mastery when they fully understand the topic. Once mastery is achieved, they are prompted to move on to the next topic within that unit or, they can select Quiz Me to validate their understanding of that topic.
Quizzes tests a student’s understanding of a unit. A student’s quiz score is based on his or her initial response to a question. At the end of the quiz, students are shown their score, what they missed, and are able to correct their errors, but it does not affect their score. After the quiz, students are shown their scores for each unit.
The Teacher Experience
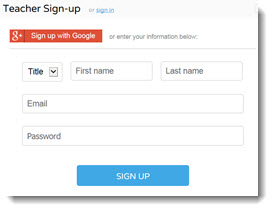
While NoRedInk’s basic service is free, you will need to set up an account to assign and track student learning. Select the blue Teacher button. You may need to scroll down to see it. (Also see the section below labeled Teacher Registration Options for other registration methods.)
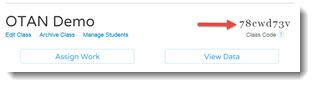
The next step will be to create your first class. Choose a unique name for each class and note the Class Code for that class. (When students register for NoRedInk, they will use this Class Code to link their account to your class.)
After that, you will need to add your students. You can either enter their names manually or they can register for a login using your Class Code. To register them manually (after you have logged in), select the Manage Students link under the class name, then select the Add Students Manually button. If you add a student manually, NoRedInk will provide a username and temporary password for you to give to your student. If the student registers themselves, you will need to provide them with the Class Code and they will choose a username and password or register with their Google account login.
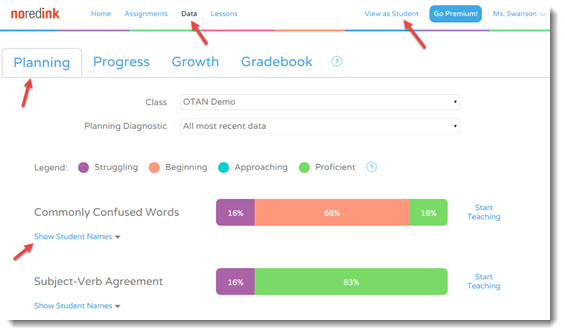
Once you have your students enrolled, you will probably want to start by assigning some Diagnostics (pre-tests) to see where your students need instruction the most. The topics are arranged alphabetically, but you can assign the units in any order you like. Once students have completed the diagnostics, select the Data link on the navigation bar and then the Planning Tab. Here you will find the overall results by unit, but if you would like to see the proficiency of each student individually, just select the Show Student Names link below the unit title. The student’s proficiency is shown as Struggling, Beginning, Approaching, and Proficient. This will help in assigning Practice units for your students or knowing where the bulk of your students are on that topic.
Any time you want to see what your students’ see, use the link on the top right labeled “View as Student.”
For more detailed information on how NoRedInk is structured, what features are available to you and how to use each feature, they have a detailed, printable tutorial (PDF) with instructions on how to add students, diagnostics, practice activities, and quizzes. They also offer a Help Center with many FAQs and numerous Teacher Help Videos. (Just a note on the videos: As of the current date (Aug 2015), NoRedInk recently underwent some site changes that have made some of the videos obsolete, but they have assured us that they are working on replacing the videos with ones that demonstrate the site with its changes.) Here and there you will also see a small blue circle with a question mark in it. Selecting those will give you more information about that item.
Teacher Registration Options
Teachers can also access NoRedInk by using the NoRedInk app at Edmodo; however, Edmodo teachers can only manage their students through the Edmodo site. And if you decide to go Premium, Edmodo will no longer work with it.
Teachers and students can also sign up using their Google+ login credentials.
The Student Experience
Students will start by registering at NoRedInk. The “Get Started” Guide for Students (PDF) may help them with the process, or you can demonstrate the process using a computer and projector. Students will need your Class Code to register, so have it available for them.
After a student registers and logs in, they have three choices. They can select their assigned tasks by looking under “What should I do next?”, or they can select Practice or Lesson from the navigation bar at the top of the page, so you should give them directions regarding what you want them to do. If you have made class assignments, they should probably start there.
If they need more help on a topic or want to study on their own, Lessons will give them a basic understanding of a topic. The Practice This button that accompanies a lesson topic will take them through a number of questions to see how well they understand the material and will tell them when they have achieved mastery. If students go directly to the Practice area, they can choose to practice any topic they like. To see what progress a student has made in the Practice area, you will need to go to Data and then Progress on the Teacher’s Dashboard.
Here’s a suggest classroom activity to get you started:
Sample Classroom Activity
In this activity, students will learn about parts of speech. The activity covers nouns, verbs, adjectives, adverbs, pronouns, prepositions, conjunctions, and conjunctive adverbs. After a lesson on parts of speech, students practice their skills using a NoRedInk assignment. Students can also use NoRedInk’s practice section to master their skills in smaller discrete units. When students feel confident, there is a quiz to test their knowledge.
This activity not only meets the needs of High School Equivalency (HSE) students, but also addresses the Language College and Career Readiness Anchor Standard One.
Preparation
- Make sure the site is not blocked at your school.
- Go to NoRedInk and register for a Teacher account.
- Download the detailed tutorial (PDF) with instructions on how to add students, diagnostics, quizzes, and more.
- You may also want to download and print the "Get Started” Guide for Students (pdf).
- View NoRedInk’s numerous Teacher Help Videos as needed. (You must have an account and be logged in for this video link to work. Some videos are in the process of being updated so bear with them if the one you find has not been. )
- Set up a class for each period you teach.
- Determine if you want to manually enroll students or have them register themselves. Either way, you will need to give them the Class Code, so either write the code on a whiteboard or give students a slip of paper with the code to use during student registration. Be sure to allow time for students to register.
- Create a Planning Diagnostic by selecting Assignments > Create and Assignment, then choosing which class and when you want the students to start. Make any other appropriate selections. In the Select Content section, be sure that All is selected then choose the following topics: Identifying Parts of Speech I, Identifying Parts of Speech II, and Identifying Parts of Speech III.
- At the bottom of the column, decide how many questions you want the students to answer during this diagnostic assignment and enter the number in the Questions per Pathway field. With this assignment, I have been selecting 10 per Pathway for a total of 30 questions. Select the big, blue Create Assignment button to complete the assignment.
- After students have completed the diagnostic, you will go to Data on the navigation bar and choose Planning. Here you will see how your students did as a whole. If a large majority of your students are in the Proficient range, and only a few need further help, you may just want to assign those students more practice and assign the remaining students to complete a final quiz on the topic. But if many are struggling with the topic, do some class instruction to help before assigning a final quiz.
- To assign a quiz, go to Assignments on the navigation bar and select the Create an Assignment button again. This time, select Quiz and create a New Quiz. Give it a Name, then decide how many questions you want, the total point value, which class you are assigning it to and then select the Identifying Parts of Speech I, Identifying Parts of Speech II, and Identifying Parts of Speech III and choose the various parts of each. Select Create Assignment.
Note: the quiz is not open until you select Start Quiz if you selected a time and date instead of “now.” - Schedule time in the computer lab if possible.
- Prepare an introductory lesson on parts of speech. Here is a printable chart (PDF) of the parts of speech with their functions and examples.
Procedure:
- Introduce your lesson on the parts of speech and their importance.
- Demonstrate how to: access the NoRedInk Web site; register (give them the Class Code and Get Started Student Guide, if necessary); log in; and find their assignments. Walk them through the process.
- Give students time to complete the diagnostic in the computer lab or at home.
- Log in to your teacher account at NoRedInk and select Data and the Planning tab. See who is having difficulty and then assign more practice to struggling students, or use the overall data to see where you need to devote class instruction time.
- After further instruction and when students are ready, assign them the quiz.
- Follow this procedure for any of the topics covered here.